
Correcting terrestrial laser scan registration for use in RealityScan - Exporting and preparing ptx scans
Author: Stefan Lindgren and Carolina Larsson - Last update 2026-08-19
Citation:
Larsson, C., & Lindgren, S. (2026). Open-Source Workflow for Correcting Terrestrial Laser Scan Registration for RealityScan [Computer software]. Zenodo. doi.org/10.5281/zenodo.21989989
Tutorial 2 Exporting and Preparing PTX Scans for Registration Correction
Purpose
Export scans from the registration software and create the working files required for registration correction.
Introduction
This tutorial converts registered PTX scans into lightweight working files that can be used for registration correction while preserving the transformation information required later in the workflow. The following example demonstrates the workflow using scans registered in Faro Scene.
Example Dataset
The following example uses scans acquired with a Faro Focus scanner and registered in Faro Scene. The object of interest is a tower located in front of a church. Although the tower itself appears correctly registered, several scans affecting the church tower in the background are misaligned.
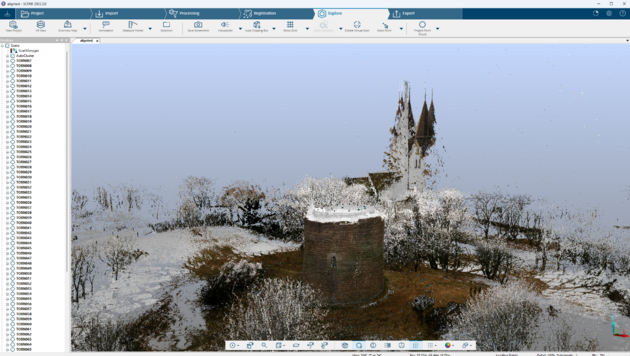
In this case we can see in Scene that the tower in the foreground, which was the object to be scanned, looks ok. But when looking at the church tower in the background it is clear that there are several scans that are misaligned. To correct these registration errors, the scans first need to be exported from the registration software.
Exporting Scans from the Registration Software
In Scene, right click on scans. Select Export -> Scans -> Scans _Ordered
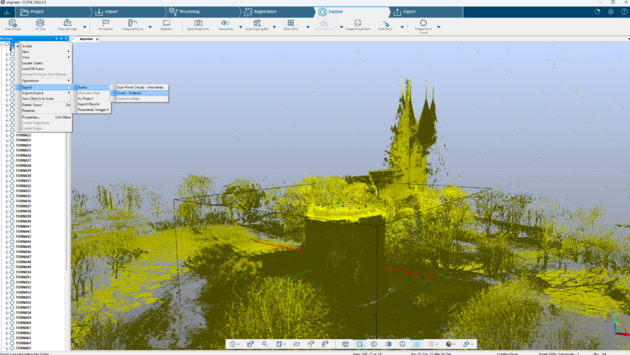
Make sure the format is PTX. Select a folder where the scans should be saved. Tic the box “Export each scan into a separate file.” Also make sure to tic the box “Color and Grey”

Why PTX files are used
PTX files are used because they preserve both the original scanner coordinates and the transformation information created during registration. This is important because RealityScan uses both pieces of information when importing terrestrial laser scans.
When PTX files are imported into MeshLab, the transformation is automatically applied to the scan geometry. To avoid losing the original scanner-centered coordinate system, the workflow creates separate working files for alignment while preserving the original PTX files.
For a detailed description of the PTX file structure, see the document Understanding PTX, MeshLab and Transformation Matrices.
Creating Working Files
The adjustment to be made only affects the alignment, not the actual content of the scans. For that reason, it is easier to work with subsampled files, since the PTX files are very big, which is why the script saves subsampled ply files.
Use the script called PTX_to_PLY_and_MLP.py.
When this script opens, select one of the PTX files in the folder with all PTX files and klick Open. The script automatically creates a subsampled PLY file in the original scan position and an associated MeshLab project file (MLP) containing the transformation information from the PTX file. It does this for all the files in the folder that contains the first PTX that was selected.
A detailed explanation of the process can be found in the document Understanding_ptx_to_ply_and_mlp.docx
Result
The result is a folder called sub_ply that contains one PLY-file and one MLP-file for each PTX-file. This folder is inside the folder with the PTX files.
These files will be used in the next stage of the workflow to recreate the original registration in MeshLab.